This post is mainly for Meg who asked how to get the Mormon.org widget on her sidebar.
Last year our church, The Church of Jesus Christ of Latter-day Saints, started a new media campaign. Our area was one of three where it was first tested. We received these great little pass along cards, heard new radio ads, saw new billboards and new TV commercials all directing people to Mormon.org for more information. Late last year the campaign went global, or at least throughout North America. You can read more about the church’s media campaign here.
The same article linked to above has what I call internet pass-along cards that you can download. I chose a few, downloaded them, then uploaded them to my flickr account. Get the url for the small size.
I then went to my blogger dashboard clicked on Layout, then on Page Elements. I clicked on “Add a Page Element” in my sidebar and choose the HTML/Java Script option.
Here is the code that you will enter substituting the url for your photo where the blue is:
<a href=”http://www.mormon.org/mormonorg/eng/” target=”_blank”><img id=”contact” src=”url for your photo here” border=”0″ /></a>
To see if you did it right click on Rich Text and you should be able to see your photo. Click “Save Changes”.
You can use this code for any picture you have and link it to any site you want simply by changing the following: red is the url for the website you want to link to, blue is the url of your photo. Also as a side note see where it says target=”_blank” after the red? That code tells your computer to open the link in a new window.
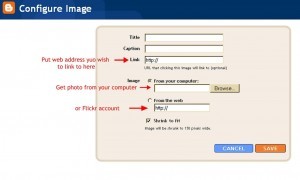
****UPDATE 6/1/08: An easier way to do this with blogger is to choose the “add a photo ” option instead of the html/java script option. When you upload your photo you have the option of linking it to URL.
The add photo page looks like this:
Hope that helps Meg!


Thank you! I’ll give it a whirl…
This comment has been removed by the author.
So I couldn’t get it to work…BUT! You pointed me in the right direction and from your other lessons, I was able to figure it out another way. What a great teacher! Thank you again. Happy Mother’s Day!
oh i know some readers who i should send here! i’m afraid i wasn’t as helpful as you’ve been! 🙂
the blog looks great! love the polkas!
Thanks for your directions!!
I’ve been wanting to do this, too! Thanks for the great info.
Thanks so much! This is great. I got it on my blog finally! These tutorials have been fantastic. Thanks for taking the time to teach us.
Thank you! I’ve been trying to figure out how to do this. I am so not as smart about computer lingo as I thought I was! Thanks for the help.
I tried and tried but couldn’t get it to work with the html function. I did finally get it by using the “picture” function with blogger. It gives you an option to link the picture to a URL, so it still does the same thing. Thank you for a WONDERFUL idea! I love your blog!!
Hey, thank you! worked great.
I did it!! Thanks so much!!!!!!!!!!!!!!!!!