Before reading this post I recommend reading the previous posts in this series:
Customizing Your Blog – Part 1 Gathering Patterns and Colors
Customizing Your Blog – Part 2 HTML Code
Customizing Your Blog – Part 3 Fonts
Customizing Your Blog – Part 4 Creating a New Header
Customizing Your Blog – Part 5 Adjusting Columns and Margins
I decided to tackle fairly easy blog adjustments today. you seasoned bloggers may already know some of these but for beginning bloggers these are very helpful especially when trying to personalize your blog to your tastes.
To begin with we’ll learn how to customize comments. Blogger has made it so much easier to personalize this area. When I first started blogging I had to go into the template code and plug in what I wanted. Now it is easy shmeezy. Notice at the bottom of my posts it tells you how many “cranially charged comments” there are. You can easily change yours to read whatever you want: friends stopped by, buzzed in, gave me love – whatever you want.
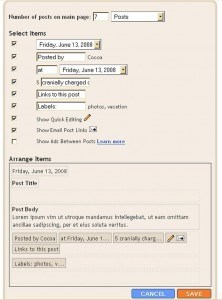
Log in to your blog’s dashboard click on Layout and then Page Elements. Click on edit under blog posts. A window will pop up that looks like this: Here’s where you adjust the basic form of all your posts. You can choose what style of date to show or decide not to show any date at all by unchecking the box. The fourth line under the Select Items heading is for your comments. Type in your choice of words there. The box at the bottom even allows you to arrange how all your posts look by dragging the date, comments, posted by, etc around.
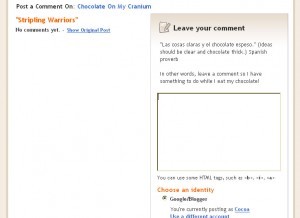
To personalize the message on your comment form (mine has a Spanish proverb about chocolate, see below) click on the settings tab in your blog’s dashboard. Then click on comments. Scroll down to “Comment Form Message”. Click in the box to the right and type in whatever message you want. When someone makes a comment on your blog they’ll see the message. Again, easy but adds a nice touch.
And lastly for today here’s how to add a signature to the end of each post. It may seem like there are a lot of steps but it really only takes a little time.
1. Create your signature by using My Live Signature. You do not need to register to use the sight!! Just scroll down and click on proceed.
2. When the new page comes up click the first option “Create Signature”.
3. On the next page again choose the first option “Using the signature creation wizard”. The site will then walk you through the steps of creating your signature. There are over 120 fonts to choose from. You also get to decide what color, size, and angle you want your signature to be.
4. After you select the slope (angle) of your signature you’ll get a page that says “Finished! The signature is ready.” Select the last option “Want to use this signature?”.
5. A new window will open. Select “Generate HTML Code”.
6. On this new screen select the first option “Generate a code for my handwritten signature”.
7. Copy the code that they give you.
8. In your blog’s dashboard select “Formatting” under the “Settings” tab.
9. Scroll down to “Post Template” and paste the code in that box. Make sure you save settings!
10. Create a new post and see your signature right there! One tip, sometimes it’s hard to get your cursor in the right spot when writing your posts and you may end up erasing your signature accidentally. I usually click on the Edit html tab and put my cursor before the signature code and start typing a couple of words. Then I click the Compose tab and finish writing my posts without having to worry about erasing my signature.
You can also add the same border or picture to the end of each post by uploading your photo to Flickr, copying the HTML code for your photo (not the URL code!) and pasting it in the Post Template box. You can even add that under your signature and have both! Take a look at Ritsumei’s blog to see what I mean. She has a nice pretty border line thingy after each post.
Next Customizing Your Blog post will cover adding a navigation bar to your blog similar to what I have below my header.

So fun! Big thanks!
Cool, thanks!
Cocoa~ These tutorials are SO helpful. You should publish them all in a book when you are done. 🙂
I actually did something…..And it worked!
Thanks so much!
Thanks!!!
WOW!! I just have to tell you that I think you are amazing and generous!!! Thank you so, so much for your tutorial on signatures. I had noticed yours here a week ago. I clicked on your actual signature and found my way to My Signature.
How cool! I picked out my signature and saved it. It looks amazingly like mine, by the way. I didn’t know what to do from there. I couldn’t figure out the HTML code thing, etc. Well, I didn’t even know about that. I just saved and tried to cut and paste. I really needed the help you provided.
You should see me right now. I am giddy. My blog has a signature, so do all my emails. I really love this. Thanks again, so much!
I will say goodnight because now I have to read your previous five tutorials.
Thanks again. ~ R
Very cool – I just added a signature and changed my comment box. THANKS for the easy-to-follow tips. Now I’m going to tell my blog readers to visit your site & learn your tricks!
OH!! You linked to *me*! How cool is that? I love your tutorials – thanks so much for putting them up. I noticed them just as I was ready to do something a bit more personalized with my blog. It’s been tons of fun figuring things out and I couldn’t have done it without you!
I’m re-doing my blog’s look, but there’s still a cute little bar there. However, I did mine by going into the “Edit HTML” section and adding the code to the post footer. It’s nice because it changes them all at once, rather than leaving the old bars behind when I want to have a new look.
OKAY! a DUH moment here! I have trying to figure out how to take off the date header at the top of the post by playing with the html.
Ihad unchecked the box so it wouldn’t show time, but it didn’t even cross my mind to uncheck the date box…. DUH!
Thanks so much! ☺