Mommytime posted on Mommy’s Martini yesterday about all the snow they’ve been getting but more importantly how she took the time to look closely at the snow and see the beauty of each individual snowflake. It reminded me of one of the funnest unit studies we’ve ever done – not on snow but on snowflakes. The following is a post from my archives.
Did you know there are seven basic snowflake groups? And those branch off into 41 other morphological types? One of the mini unit studies we’ve covered this week has been all about snowflakes. We’re missing the real stuff here so we’ve been making our own paper versions.
A+ Snowflakes is THE place to find snowflake patterns on the web. We have been having so much fun using their patterns and also creating our own. Just learning how to properly fold your paper before cutting makes a world of difference. It takes the “oh, that’s a good one” snowflake to “that is beautiful!”
We also plan on looking at real snowflakes the next time it snows. Have you ever tried that? We have before. Take a sheet of black construction and a strong magnifying glass with you outside the next time those flakes are coming down. It’s amazing how intricately beautiful and different each snowflake is. Kinda like people.
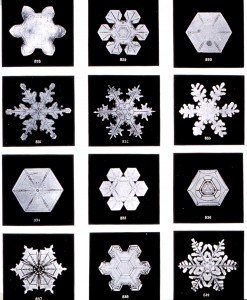
While visiting A+ Snowflake make sure you take a look at the photos of real snowflakes that were taken by W.A. Bentley. They were published in his “Studies among the Snow Crystals” back in 1902. Fudge, my ever observant five year old, declared “That means those pictures are over 100 years old! Surely he [Mr. Bentley] would be way dead by now.” Here’s a few of our favorite photos by Mr. Bentley published online courtesy of The National Oceanic and Atmospheric Administration.
Some tips we’ve picked up just from making our snowflakes yesterday:
#1 Use tissue paper, coffee filters, wax paper or other thin paper so little fingers can cut the snowflakes too. Regular paper is too thick.
#2 It’s also easier for the littlies if you draw designs on the folded paper for them to cut out.
#3 And of course, the funnest part is opening up your paper to see your new beautiful creation. Just be careful, the thinner paper will rip, and then you’ll have a crying child because “it took me at least five minutes to cut that!” so then you must fold another one and cut it yourself for them, but it’s not as good as their first one was going to be so to appease the little bugger you have to make another one so that at least they’ll have two, whereas before they would only have had one. Ask me how I know!

I had meant to come back and say THANK YOU for your tutorial! (You probably saw me on here with about 6 million page views the past few days.) Your blog was the first I had seen with images that were links along the top. Once I realized it was possible to do that in blogger, I got motivated.
Thanks for coming by! I’m a huge chocolate fan, so I’ll be back to check out your recipes! =]
I am totally going to make snowflakes with my kids today (I was looking for something to do with them on their day off). Thanks!
You might also like to read the book Snowflake Bentley, about the man who first photographed snowflakes. It’s a children’s story with facts along the sides of each page.
Ohhhh those are beautiful snowflakes…the “wonder” inside of me just got “wonderfull-ed”..thanks!
I always take wonder in the wonderful creation our Creator gave us – and each little snowflake truly does represent that. Thanks for the post and I love the last little bit about the kiddos and the snowflake breaking – it is so true – the drama that can unfold. Cheers
This will be a fun activity to try and if I forget to do it this week it is sure to snow through April here!
Thank you for this great idea (and the nice link). I’ve been reading “Snowflake Bentley” to my kids for the last few days and marveling over his dedication.