One drawback to having a free blog with blogger is the inability to easily upload files other than pictures or videos to your blog. I am often asked how to get files, specifically pdf files, onto a blog post. The only way to do it is to have your file “hosted” on another site. There are many different hosting sites, some of them free, where you can upload your files, grab the url to the file, and then create a link in your blog post to those files. Here are three different hosting sites I’ve had experience with.
Scribd
Scribd is free to use. You can upload pdf, Word, Excel, and Powerpoint files to share with others. One plus about Scribd is you can embed the document right into your post so others can scroll through it and see what is in the file before downloading. Downside of this, only those with a Scribd account can download. Anybody can print from the embedded files but, as I learned from sad experience, if the document wasn’t scaled to fit properly on the paper it will print off HUGE. Most of my Family Home Evening Lessons are hosted through Scribd.
Scribd keeps track of how many views each document gets and how many times it has been downloaded.The family home evening lessons have a download total of 5,326!
FileSavr
FileSavr is another free hosting site. There are no bells or whistles to filesavr. Just upload your document, grab the url, and use it in your post. When someone wants to download your file it takes them to a new window with a big green download it button in the middle of the screen.
I use FileSavr to host my flannel board stories because those files are LARGE. They are actually zip files for faster downloading but they still take a while. FileSavr will tell you how many times the file has been downloaded. Downside, there is no preview before download.
Google Docs
If you happen to have a gmail account you can upload most file types with Google Docs. While you can’t actually embed the document in your post like with Scribd, when the link you provide in your post is clicked on it will open in a new window where others can scroll through the document to see what’s in it before downloading or printing. One plus is others don’t have to have a Google account in order to download or print. If I had known about Google Docs before using Scribd for all my FHE lessons I would definitely have used it instead only because it would have been easier for others to download. One downside about Google Docs, you can’t track how many times a document has been downloaded.
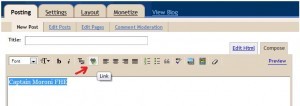
Once you have your document uploaded to a hosting site you need to grab the url to your document (copy the url to your clipboard by hitting ctrl and c at the same time). Most sites will tell you how to do this (all are different which is why I’m not going to tell you here). In your blog post type the name of your document, highlight it, then click on the link button above your post window (it looks like a chain link)
and paste the link in the line provided (ctrl and v together).
Now you have added a pdf file (or at least the link) to your blog post.
I know there are many more file hosting sites to choose from. These are the ones I have experience with.
As a little bonus, ever wondered how to get your links to open in a new window so your readers aren’t lead away from your site?
Click on the edit html tab when writing your post after you’ve created a link. Now scroll through your document until you find the link you created. It will be in html code so it will look like
<a href=“http://www.filesavr.com/“>FileSavr</a>
copy the following code: target=”_blank”
and paste it after the part in red (which is the url or link address) so it looks like this:
<a href=“http://www.filesavr.com/“target=”_blank”>FileSavr</a>
That target code tells your browser to open the link in a new tab or window so your readers don’t navigate away from your site.

© 2007-2009 Chocolate on my Cranium, LLC all rights reserved


Leave a Reply